Community Week
Here is the second part of my little GIMP photo editing tutorial  (Smile)")
Let's start with the easiest part!
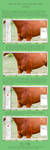
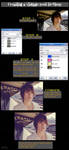
When you want to desaturate your photo, there are three options.

If you chose Lightness, most likely your photo will have a slightly higher contrast than when you chose Luminosity, but it will also show more noise.
As you can see in the right picture, desaturating your photo based on luminosity will reduce the noise.
I almost never use Average, but it is pretty good when you want a mixture of both options


If you need to sharpen your photo, you can use the "Sharpen" or "Unsharp Mask" tool.
Anyway, both of these tools aren't perfect! You should try to take photos that are as sharp as possible, for a really sharp picture is always better than a photo sharpened in GIMP.

Here you can see the differences. The picture on the left is unsharpened, on the picture in the middle I used the "Sharpen" tool and the right one is edited with the "Unsharpen Mask".

For close-up photos or photos with a small resolution, the sharpen tool works quite well, though i don't see a huge difference when i use it on photos with a high resolution, so mostly I prefer the Unsharpen Mask.
Both of them amplify the noise, but the sharpen tool is a bit worse. The more it sharpens your picture, the more noise it will add.
The unsharpen mask doesn't increase the noise as much, but it darkens some parts which lowers the dynamic range.
If you are in doubt, just try both of them and see which works better for your photo!
Another important part of editing is skin retouching.
As you can see below, there are a few blemishes on the skin... how do we remove them?

Beginners often use the smudge-tool, which is a huge mistake.
As you can see in the left picture, the smudging is very obvious and looks unnatural.
In the right picture, the skin is retouched with the healing-tool which will give you a much better result.


The smudging tool can still be useful if you want to make the skin look smoother overall.
Just copy your layer, smudge the skin and lower the opacity.
Be careful! Don't smudge any contours, like the outline of the chin or the nose; this would make your photo look blurry.


The last part is about another common beginner's mistake: the soft glow tool.
Yes, it can yield good results...


... but often, it will blur your photo and make certain parts look overexposed.
The best solution is creating the soft glow manually.
Here is a tutorial about dreamy pastel photos, Step 3 explains how to add a soft glow: fav.me/d2lv533
And here are some other helpful tutorials for editing your photos in GIMP


Let's start with the easiest part!
When you want to desaturate your photo, there are three options.
If you chose Lightness, most likely your photo will have a slightly higher contrast than when you chose Luminosity, but it will also show more noise.
As you can see in the right picture, desaturating your photo based on luminosity will reduce the noise.
I almost never use Average, but it is pretty good when you want a mixture of both options
If you need to sharpen your photo, you can use the "Sharpen" or "Unsharp Mask" tool.
Anyway, both of these tools aren't perfect! You should try to take photos that are as sharp as possible, for a really sharp picture is always better than a photo sharpened in GIMP.
Here you can see the differences. The picture on the left is unsharpened, on the picture in the middle I used the "Sharpen" tool and the right one is edited with the "Unsharpen Mask".
For close-up photos or photos with a small resolution, the sharpen tool works quite well, though i don't see a huge difference when i use it on photos with a high resolution, so mostly I prefer the Unsharpen Mask.
Both of them amplify the noise, but the sharpen tool is a bit worse. The more it sharpens your picture, the more noise it will add.
The unsharpen mask doesn't increase the noise as much, but it darkens some parts which lowers the dynamic range.
If you are in doubt, just try both of them and see which works better for your photo!
Another important part of editing is skin retouching.
As you can see below, there are a few blemishes on the skin... how do we remove them?
Beginners often use the smudge-tool, which is a huge mistake.
As you can see in the left picture, the smudging is very obvious and looks unnatural.
In the right picture, the skin is retouched with the healing-tool which will give you a much better result.
The smudging tool can still be useful if you want to make the skin look smoother overall.
Just copy your layer, smudge the skin and lower the opacity.
Be careful! Don't smudge any contours, like the outline of the chin or the nose; this would make your photo look blurry.
The last part is about another common beginner's mistake: the soft glow tool.
Yes, it can yield good results...
... but often, it will blur your photo and make certain parts look overexposed.
The best solution is creating the soft glow manually.
Here is a tutorial about dreamy pastel photos, Step 3 explains how to add a soft glow: fav.me/d2lv533
And here are some other helpful tutorials for editing your photos in GIMP